Don't be fooled. Inside this thin coating of sweetness is a fiery core of total insanity.
Monday, June 17, 2013
Foliage Follow-up -- June 2013
For Foliage Follow-up, I usually either focus obsessively on photographing and showing you every interesting leaf in my garden, or I try to show the leaf combos that I've come up with, either deliberately or accidentally.
Today I thought I'd do something a little different and combine a little "How To" with my foliage. Or maybe more like "How I Did It," since I'm not really enough of an authority to write a "How To," at least where these plants are concerned. I'm showing what I did when I repotted my new Dyckia 'Precious Metal.' I guess time will tell if I did it right.
I never did post about where I got my new Dyckia, but Peter at The Outlaw Gardener did. Read about our visit to Western Horticultural Products (WeHoP) here.
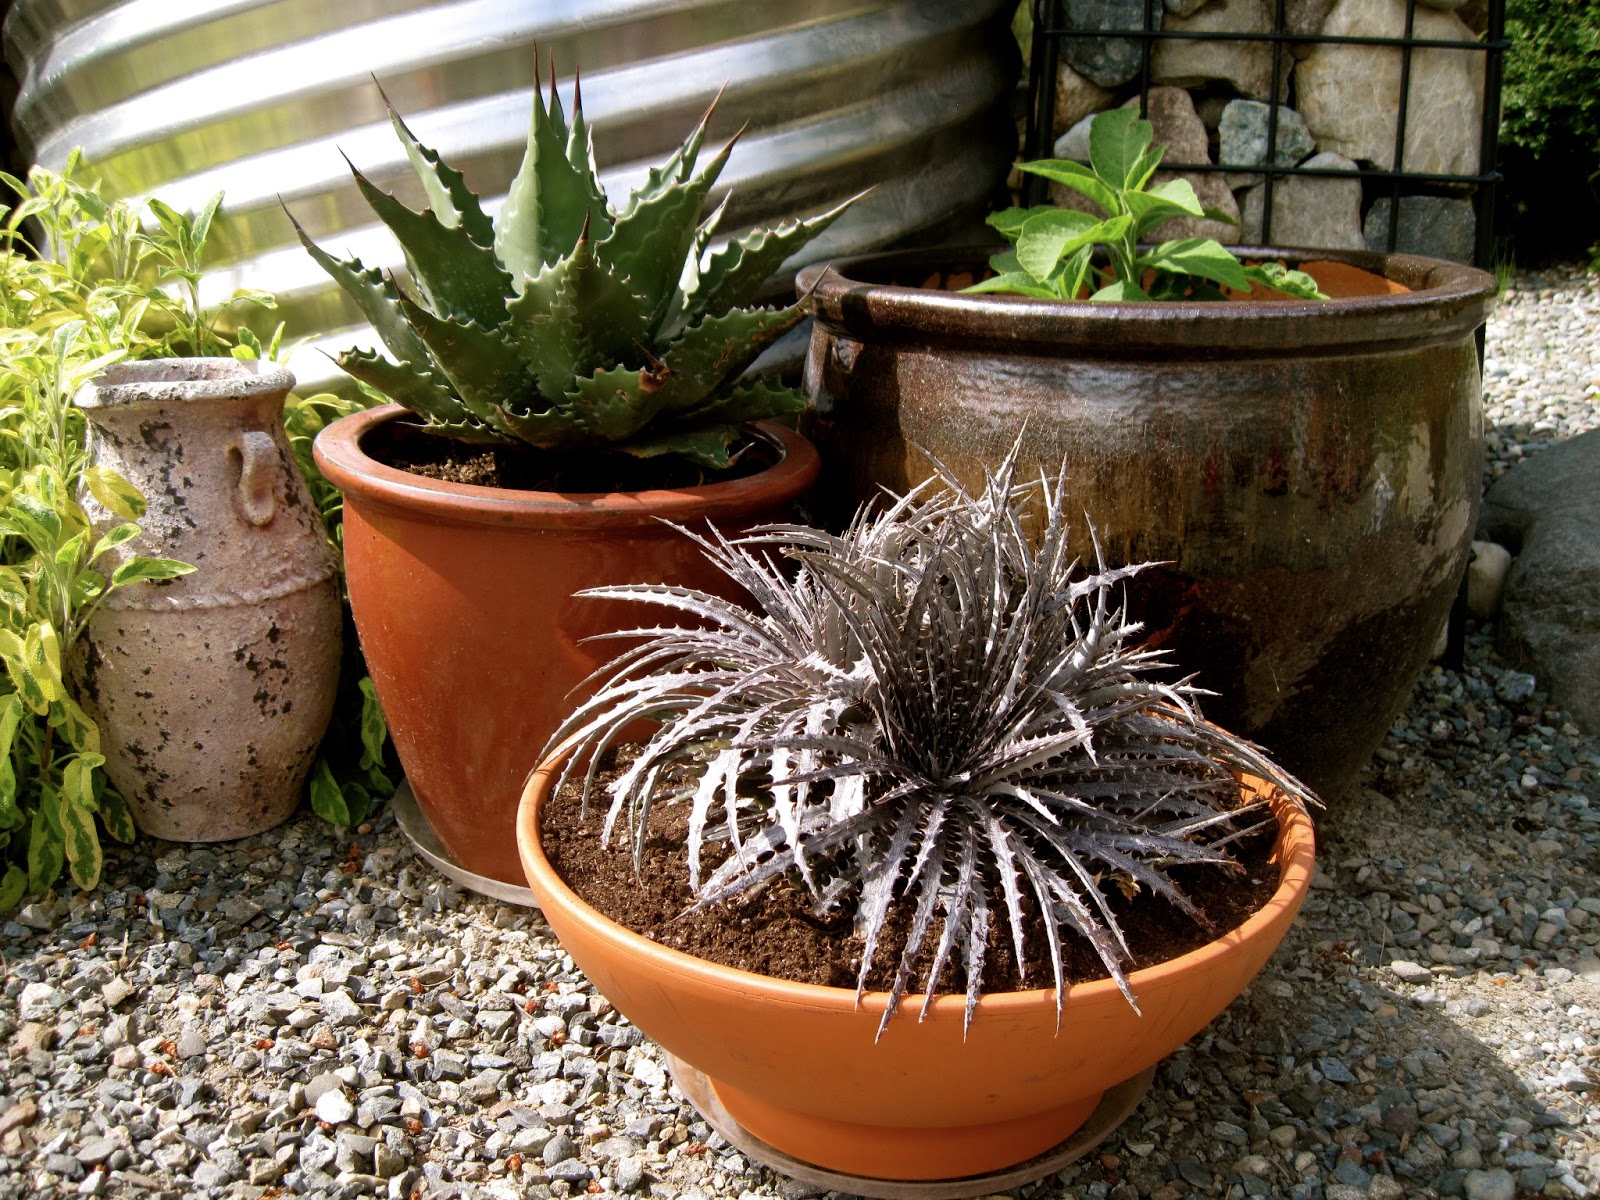
When I first brought it home from the nursery, I plunked it into this pot, still in its nursery pot and not exactly looking elegant, where it's been sitting for the last few weeks. But after some reading online, I found that a better pot for a Dyckia is one that is wider than it is tall, and with a bit of room to spread. So I went in search of a new pot. I didn't have anything that would really suit in my stash of decorative pots, so I went on the hunt, first to Fred Meyer (they've had a Buy Two Get One Free sale going on and unfortunately the pots were already too picked over), and then to Windmill Gardens Nursery.
I bought the pot that is holding this succulent collection at Fred Meyer and went back hoping to find something similar, but no such luck. This has the right form factor.
I found this simple terra cotta pot at Windmill Gardens. It doesn't have to be frost hardy, because the Dyckia is going to have to overwinter inside the house. Also, this was nice and light, unlike the frost-hardy ceramic pots that I found, which is important since I'm going to have to haul it into the house every winter.
It doesn't look like it will work, does it?
First thing I did was remove it from its nursery pot and give the roots a good roughing up, dislodging as much soil as possible, which would allow me to spread the roots out in the new pot.
I had also read online that Dyckias actually like a bit of moisture retention in their soil, so rather than repotting it with 100% cactus soil, I used a mixture of cactus soil and regular potting soil. The soil it was sitting in was dry, and came away from the roots quite easily.
I also brushed a lot of soil away from the crown of the plant, and then pulled off as many dead leaves as I could grab with my gloved hands.
In case you're wondering about those gloves, they are great and essential for dealing with spiky, thorny plants.
I don't remember where I got them, but since I could only find a link
online to Sears, it might have been there. Check them out here. They're from a company called
SuperProtection, Inc., and I bought them many years ago for cutting back weedy brambles and multiflora roses when we lived in Massachusetts. None of the spikes from either the Dyckia, or the Agaves that I also repotted, has ever gotten through these gloves.
The Dyckia in its new pot, with a little room to spare.
Since I was on a roll, I also repotted the Agave 'Baccarat' that I bought in February at the Northwest Flower and Garden Show.
It needed to be cut out of its pot with tin snips.
I also brushed a lot of soil away from the crown, pulled off some dead leaves, and gave the roots a good pulling apart, since it was so pot-bound.
Spiky goodness in new pots
What to do when there is still time left in the day, and more spiky plants that need some TLC? Keep going...
Remember this poor Agave americana, that got left out all winter? I was sure it hadn't survived, but some of its pups had, so they needed to be removed and saved.
Not only were there four pups above the soil, but there were loads twining around the pot, trying to get a gasp of air and find some sunlight.
Those pups didn't survive the repotting. None of them had roots yet, and I really needed to extricate the good ones from the dead mother plant, so I rather brutally sacrificed all those babies. But the four that had already popped up through the soil around the mother plant did make it into new pots.
Plenty of roots so they'll probably make it.
As I pulled off dead leaves and hacked away at the root ball, I discovered that mom was actually alive, somewhere inside all that dead foliage.
I pulled off and peeled away the dead leaves, rather like an onion, which left me with this.
And this.
The largest pup and the mother went into a couple of good-size fiberglass pots.
Mom, looking a bit beat-up but definitely alive.
Oldest daughter in her new pot
The other babies survived their ordeal too, so far.
While I was at it, I decided it was probably a good time to bring out a bunch more Agave pups that a kind fellow garden blogger, Cindy at My Corner of Katy, had sent me a few months ago, when she heard me whining complaining about having lost my Agave americana over the winter. So far I've managed to keep most of them alive.
At some point, they will either get repotted into good-looking pots, or some of them might even get in the ground. For now, I'm sure they're just glad to get some real sunlight and outside air.
Foliage Follow-up takes place on the 16th of every month, the day
after Garden Bloggers Bloom Day. It's the brainchild of Pam Penick at her blog Digging, and
celebrates leafy goodness in the garden. Lots of other bloggers join in,
and leave their links in the comments. Pam's post is also about spiky
plants, so check it out here, and make sure to visit the other bloggers
who are participating too.
I'll leave you with a video about another Spike who didn't like sunlight quite so much.